The Scikit-HEP Project
Abstract
The Scikit-HEP project is a community-driven and community-oriented effort with the aim of providing Particle Physics at large with a Python scientific toolset containing core and common tools. The project builds on five pillars that embrace the major topics involved in a physicistâs analysis work: datasets, data aggregations, modelling, simulation and visualisation. The vision is to build a user and developer community engaging collaboration across experiments, to emulate scikit-learn’s unified interface with Astropy’s embrace of third-party packages, and to improve discoverability of relevant tools.
1 Introduction
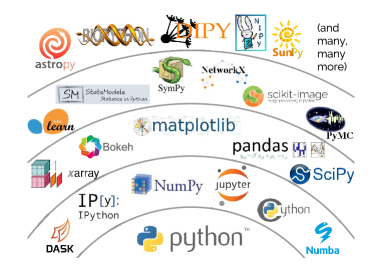
It is acknowledged that Python is an extremely popular programming language across a broad range of communities. Outside High Energy Physics (HEP), the Python scientific ecosystem is built atop the "building blocks" of the SciPy ecosystem of open-source software for mathematics, science, and engineering SciPy . A self-explanatory visualisation of the ecosystem is given in figure 1. The ecosystem grows to incorporate data manipulation and visualisation tools, packages for statistics and machine learning, etc. At the top of the "pyramid" lie domain-specific projects – for example, astropy astropy – which build on and exploit the building blocks.
Traditionally, HEP has been evolving in a rather disjoint ecosystem based on the C++ ROOT data analysis framework ROOT . Same as for the Python scientific ecosystem, it provides tools for data manipulation and modeling, for fitting, for statistics and machine learning applications. But it is a toolkit rather than a toolset, with bindings to Python.
Various initiatives exist or have existed, which try and link both HEP and non-HEP worlds. But they mainly tackle(d) specific topics. We believe there is need for a more generalised effort, domain-specific oriented.
2 Scikit-HEP project overview
The Scikit-HEP project Scikit-HEP-project is a community-driven and community-oriented effort with the aim of providing Particle Physics at large with a Python scientific toolset containing core and common tools. The project builds on five pillars that embrace the major topics involved in a physicistâs analysis work: datasets, data aggregations, modelling, simulation and visualisation.
The project should neither be seen as a replacement for ROOT nor a replacement for the Python ecosystem based on the SciPy suite. It is rather the following:
-
•
An initiative to improve the interoperability between HEP tools and the Python ecosystem, expanding the typical set of tools for HEP physicists with common APIs and definitions to ease âcross-talk".
-
•
An initiative to build a community of developers and users.
-
•
An effort to improve discoverability of relevant tools.
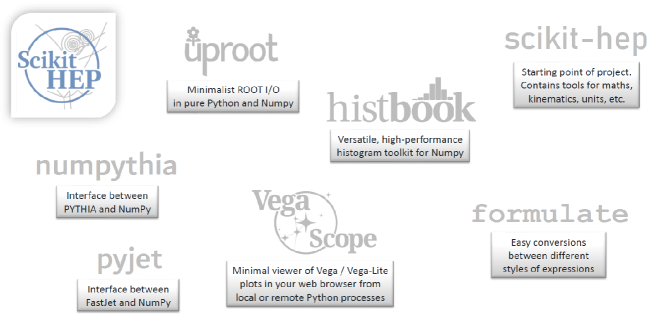
The Scikit-HEP toolset is depicted in figure 2. For completeness, it should be mentioned that the well-known packages root_numpy root-numpy and root_pandas root-pandas , pre-dating the project, are not described in this report. They are nevertheless part of the project, but somewhat deprecated by the new and more versatile package uproot uproot , see below.
The remainder of this report briefly presents each package with simple examples of main functionality.
3 Scikit-HEP packages walk
A ROOT file can natively and trivially be read with the pure I/O uproot package uproot . The package strength lies in the fact that it does not depend on ROOT, making it installable on virtually any computer via a pip install uproot command. It bridges the ROOT and the NumPy-powered worlds. A ROOT TTree object is read as a dictionary of arrays as follows:
Going beyond simple NumPy arrays, the scikit-hep package scikit-hep provides dataset classes storing provenance information, where variables are also easily created on the fly:
Data selections can be performed in a variety of ways:
The formulate formulate package eases the conversions between different styles of (selection) expressions:
The manipulation and analysis of datasets typically involves data aggregations and visualisation. The package histbook histbook provides a versatile, high-performance histogram toolkit for NumPy. The histograms, often created from ntuples, can be of arbitrary number of dimensions. The package provides methods for selecting, rebinning, and projecting into lower-dimensional space. The created histograms are subsequently exportable to a variety of formats, such as ROOT, Pandas, etc. They can be plotted with Vega-Lite VegaLite , a high-level grammar of interactive graphics built on top of Vega Vega , a declarative language for creating, saving, and sharing interactive visualisation designs:
VegaScope vegascope is a minimal viewer of Vega and Vega-Lite graphics from Python. It provides visualisation in the web browser from local or remote Python processes.
The numpythia numpythia and pyjet pyjet packages provide interfaces between NumPy and the Pythia Pythia event generator and the FastJet FastJet jet finding algorithm, respectively. The collision events generated with Pythia are piped into NumPy arrays:
The pyjet package can trivially receive the inputs from the above and feed the generated events into FastJet:
4 Outlook
The Scikit-HEP project is gaining interest and momentum as a Python library for HEP analysis. Some of the packages are in fact being used by other communities, in particular the astroparticle physics community.
Much can already be done with the packages described here. The various packages presented are being further developed and improved as users get to strain test them, and provide feedback. It is foreseen that other packages join the project in order to complement the offered toolset.
Anyone is welcome to get in touch as user or developer via the public scikit-hep-forum mailing list. All project administrators and package maintainers can be reached with the scikit-hep-admins mailing list.
Acknowledgements
This work is supported by the United States National Science Foundation under award number ACI-1450319. Any opinions, findings, and conclusions or recommendations expressed in this material are those of the author and do not necessarily reflect the views of the National Science Foundation.
References
- (1) Eric Jones, Travis Oliphant, Pearu Peterson et al.,SciPy: open source scientific tools for Python, http://www.scipy.org/
-
(2)
The Astropy Collaboration, Thomas P Robitaille et al., Astropy: a community Python package for astronomy,
Astronomy & Astrophysics A 33 (2013) 558,
http://doi.org/10.1051/0004-6361/201322068 -
(3)
Jake VanderPlas, The Unexpected Effectiveness of Python in Science,
https://speakerdeck.com/jakevdp/the-unexpected-effectiveness-of-python-in-science,
PyCon 2017 - (4) The ROOT data analysis framework, https://root.cern.ch/
- (5) The Scikit-HEP Project, http://scikit-hep.org/
-
(6)
Noel Dawe et al.,
“scikit-hep/roo_numpy” [software],
Zenodo, http://doi.org/10.5281/zenodo.592881 -
(7)
Chris Burr, Igor Babuschkin et al.,
“scikit-hep/root_pandas” [software],
Zenodo, http://doi.org/10.5281/zenodo.593933 -
(8)
Jim Pivarski et al.,
“scikit-hep/uproot” [software],
Zenodo, http://doi.org/10.5281/zenodo.1173083 -
(9)
Eduardo Rodrigues et al.,
“scikit-hep/scikit-hep” [software],
Zenodo, http://doi.org/10.5281/zenodo.1043949 - (10) Chris Burr, “scikit-hep/formulate” [software]
-
(11)
Jim Pivarski et al.,
“scikit-hep/histbook” [software],
Zenodo, http://doi.org/10.5281/zenodo.1284426 - (12) Vega-Lite â a grammar of interactive graphics, https://vega.github.io/vega-lite/
- (13) Vega â a visualization grammar, https://vega.github.io/vega/
- (14) Jim Pivarski et al., “scikit-hep/vegascope” [software]
-
(15)
Noel Dawe, Eduardo Rodrigues, Henry Schreiner,
“scikit-hep/numpythia” [software],
Zenodo, http://doi.org/10.5281/zenodo.1471492 -
(16)
Noel Dawe, Eduardo Rodrigues, Marcel R.,
“scikit-hep/pyjet” [software],
Zenodo, http://doi.org/10.5281/zenodo.1197493 - (17) Pythia, home.thep.lu.se/Pythia/
- (18) M. Cacciari, G. P. Salam, G. Soyez, FastJet user manual, Eur. Phys. J. C 72 (2012) 1896, https://doi.org/10.1140/epjc/s10052-012-1896-2